Sunday, May 29, 2011

Swivel Knife Cuts

I have been practising my swivel knife work.   I do not like decorative cuts on floral carving, but I really like cuts just to decorate the leather without any tooling involved.  This piece was some leather lying around where I had illustrated to someone the difference embossing can make to a frame, here a frame made by swivel knife cuts.  The immitation wood on the right was just bevelled and cut on flat leather, while the frame on the left also had a plug behind it to give a more 3-D look to the frame.     

This left enough open leather for swivel knife cut exercises.

Next month the guild is going to have a fun share project of covering cans in leather, so I decided to get the first two leather 'jackets' ready for two small cans.

The one at the top of this picture will just be swivel knife cuts, inspired by Jim Linnell.   My rope effect will form a border at the top of the can.

In the second design, I decided to explore the possibility of slightly beveling the basic decorative swivel knife cuts.   It appears on this photo at the top.

Here is a bit more of a close-up.

...and even more detail to show you how I just let the beveling fade to nothing so that the design did not lose its light clean feeling.

Finally I decided to fill in a but just with knife cuts and I think it worked....

More on the covered can project later!

Tool Boxes

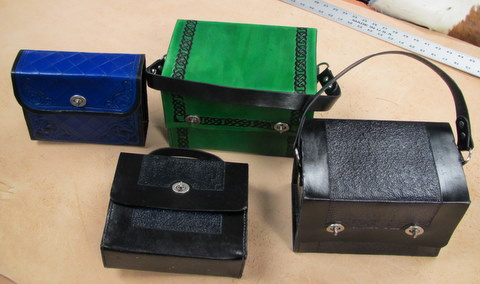
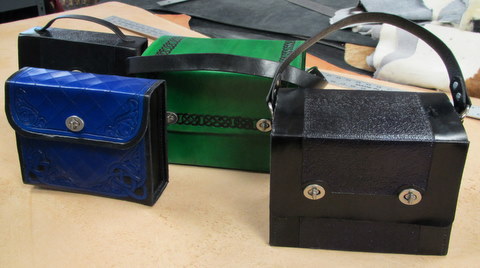
Not since Peter Main's toybox have I seen nice tool boxes like these!

Made by Jason Rolfstad.
They are made of a nice thick leather with formed gussets, so they are nice and sturdy, ever before the insides are installed.


The neat simple decoration add a lot to their appeal.


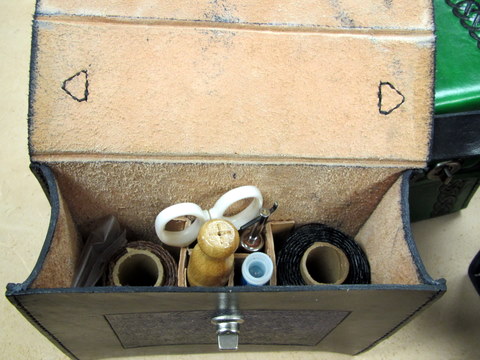
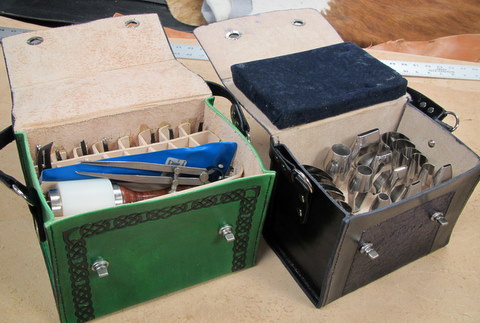
The narrower toolbox with all the hand sewing supplies, has leather dividers glued into place to keep everything neat.


To keep the end-punches neat, Jason layered pieces of cut leather in such a way that where they had slots in them, they would form holes where the tool handles would fit into.


I have been inspired - now I must just find the time!

Friday, May 27, 2011

New Design - A Timeline

A friend liked the cell phone case I tooled for my smartphone and wanted to see it, but I did not like the design too much - so I decided to come up with my own design.  It took a few doodles before it took shape in my mind and on paper and on the right hand you can see the final design on paper with the tracing film and leather with swivel knife cuts on the left.

As soon as I took the first photo, I decided to use the timestamp on the digital camera to record how long this little project took me to complete.  So to reach the stage above and below, probably about 45 minutes.

39 minutes later and I had the basic beveling done, as seen below.  (Total 84 minutes)

34 more minutes got the extra few decorative stamps and the backgrounding done.  (Total 118 minutes)

Another 30 minutes (without drying time) was used to apply Eco Flo Highliter and spray with Supersheen.  (Total 148 minutes = 2 hours 28 minutes)


email me if you want a copy of the pattern : leatherworker at gmail.com

Tuesday, April 05, 2011

Yellowing Combination

Someone showed me this curious case:

To color the roses, he first put down a layer of white acrylic paint and then did the lilac color in waterbased dye over the white.  he then sealed it with two coats of SuperSheen and then hit the whole belt with Tan Antique Gel.  The lilac color instantly turned to yellow - luckily a rich golden yellow and the belt looked fine afterwards.  

But it was not his intended result.  I was able to test the same on his test rose that you see lying next to the belt. (The pic on the right was what he used to color the roses from.)

I put Tan Gel antique on the upper tip of the rose and as you can see, that turned yellow.   Then I put Dark Brown Antique gel over the middle section and it had now effect on the lilac color at all.

Any suggestions?

Sunday, March 06, 2011

Done really Fast

If you really want to do nice work, make something for someone else and speed through it at top speed!

That is how this check book cover got a quick, but very effective, double whip stitch edge - no time for double loop lacing.

Digital photography once again conceals the true beauty of the dye job.  I used a dauber ful of red dye to apply Saddle Tan Gel Antique and then sprayed it with supersheen.

Wednesday, March 02, 2011

Tandy in SA!

I just saw the news that Tandy now has a website just for South Africa.   Hopefully this will make its products and leather more accessable to South Africans.

Here is a link to the page:  TANDY SA

I see the orders will probably be processed from Woodheads in Cape Town.  That is where I bought my first 3 ounce belly, the basic tools and made a 2" wide belt for my bell-bottom pants on the mother's dining room table (no marble stone at that stage and no sence about the right weight of leather to use!  That was in January 1978.  I should probably publish a picture or two of that first belt!  I did actually use it too....

Tuesday, March 01, 2011

Rob Barr

Two weeks after I arrived in the USA, I attended the IFOLG show in Ft Worth.  My sons were only 4 and 6 years old and asked where I was going.  I told them and also metioned that I would meet real Cowboys and Indians. One of the asked me if I would be able to play with them!   I had to explain more - these were going to be real people just like us.

At the show I met Rob Barr for the first time and told him the story - he had a very good laugh about it and immediately raked someone closer to take this photo of me holding his pony tail to prove to my sons that I had indeed met a real Indian.

Years later in Topeka at a similar show, my sons were lucky enough to meet Rob and we had a nice long visit.

Rob has since passed into the next life, but remains a source of inspiration in my leatherwork.

Thursday, February 10, 2011

Imperial Lace

Imperial Lace comes in four colors - these three and then white.  I carried a piece of edge braid for four months in my pocket with my keys and the white lace remained pretty clean.  What little dirt there was, wiped off with a wet cloth!

One of the first items I made with the Imperial lace was a dog leash - the contrast with the white is amazing!

Here is a Mexican round braid using three different colors:

One of the very best uses of Imperial lace is around the edges of projects with a double loop braid.  the lace lies nice and wide and covers the edges very well.

Some detail:

(The cross on this check book cover was embossed with a very thin leather plug at the back.)

Here is a bit of fun close up of the tooling:   (The stamps used were two hand made tools - made by Jason R)

Saturday, February 05, 2011

Oxidation

When I was a small boy, Condy's Crystals was widely used as a disinfectant.

Then I discovered that I could 'paint' with it on leather!  Almost like watercolors, except only in one color - a very nice neutral brown.  The Potassium Permanganate is a very strong oxidizing agent that turns the leather brown immediately (it will do the same to your skin too).  The stronger your sollution of Potassium Permanganate, the darker it will color the leather.

Just like Vinagroon, this is a chemical stain and is quite permanent.  (There is some suggestion that a mild acid like lemon juice will fade out the browning effect, so I am a bit suspicious that this cover of mine had more contrast when I made it.  Some of the darker shades of brown might have "faded" due to the acidic nature of the leather itself.)

Well, in about 1994 I bound a set of health magazines and picked this design for the cover.  It was done on a split.

You should read up a lot about it, before you use it!  It can be dangerous in contact with the wrong substances.  See More.

Sunday, January 23, 2011

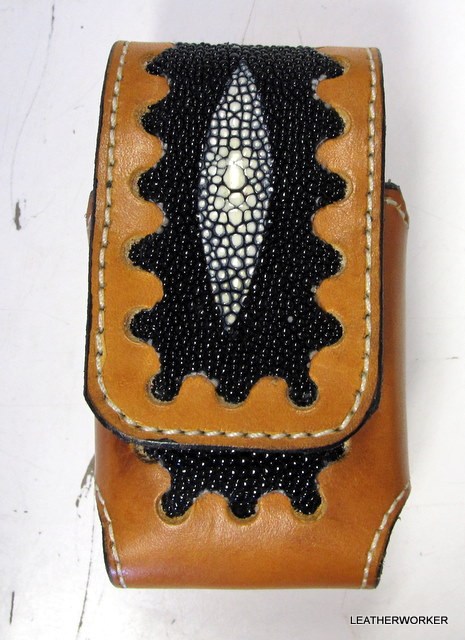
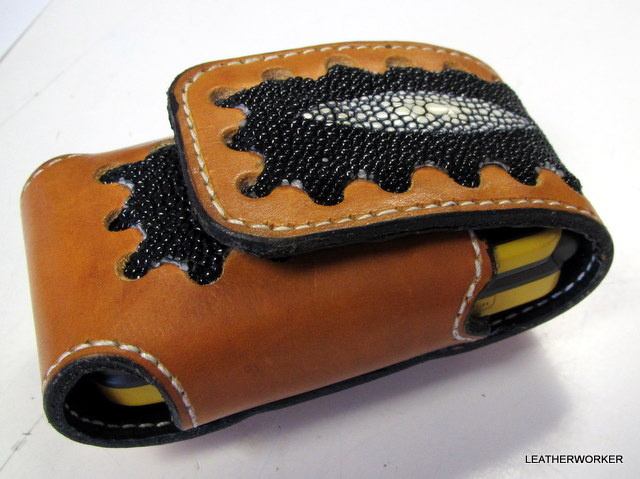
Stingray Cell Phone Case

This little Cell Phone Case to hang on your belt, was made by Eric R.  He used the same effect he uses with the seams on his gun cases to frame the inlay of the stingray.