Monday, October 02, 2006

From the distant past

Just dug up these old newspaper articles. And I realized if I do not digitize and electronify them now, they are going to be lost soon - they were real yellow already. But, cyber era to the rescue and here I have them "renewed" again.

This photo with the few words appeared in a local newspaper in Roodepoort South Africa in September 1985.


Some of the interesting scenes at the Roodepoort Publicity Association Hobby and Country fair recently. Enthusiasts from all over the West Rand came to see the exquisite dolls and other hobby demonstrations. Here are a few of them: Johan Potgieter, caught deep in concentration, while decorating a piece of leather.

Update April 5, 2019:  Found the whole article - 


Thursday, October 27, 2005

Restoration Progress even Further


The coloring of the figure is done and the picture looks close to what it was when I finished it twenty years ago. Looking at the original photo shows that it must have been close to the same hue of brown that I used then as well.

On the next photo the background has also been given a light coat of tan to cover the white scars left by the thinners when I removed the Neatlac layers that covered the original.

The next step is rubbing on Dubbin to seal and waterproof the leather and help preserve it. You can see the rich lustre it gives to the leather and the spirit based dyes.

Tuesday, October 25, 2005

Restoration Progress

Slowly but surely the former image is emerging from the faded leather.

Wednesday, October 19, 2005

Restoration

This was the original work a few years after I finished it in 1982 - it is about fifty inches high and forty inches wide. Done on veg-tan African Buffalo leather - the hide was a gift from a friend and I had it tanned at a tannery near Johannesburg.

The artwork is a copy of a drawing by Hogarth, one of the original Tarzan artists - it is from his book "Dynamic Light and Shade."

This wall hanging has traveled extensively with me and when the glue-gun glue finally came off the back and let go of the leather frame, I decided it was also time to get the whole thing restored.

So I attacked it with thinners and a hefty scrubbing brush to get the four layers of Neat-Lac off - the dye had faded badly as you can see on the next photo.

With the leather clean again, I am now busy dyeing the figure first as close as I can to the original. On this second photo you can see the small piece that has been done so far. I am very pleased with the results.


Wednesday, September 14, 2005

From my Archive, a Cleaner

Found this in 'Henley's Twentieth Century Formulas, Recipes and Processes (1926):

CLEANING SKINS AND LEATHER:
To Clean Colored Leather. — Pour carbon bisulphide on non-vulcanized gutta-percha, and allow it to stand about 24 hours. After shaking actively add more gutta-percha gradually until the solution becomes of gelatinous consistency.

This mixture is applied in suitable quantity to oil-stained, colored leather and allowed to dry two or three hours. The subsequent operation consists merely in removing the coat of gutta-percha from the surface of the leather—that is, rubbing it with the fingers, and rolling it off the surface.


The color is not injured in the least by the sulphuret of carbon; only those leathers on which a dressing containing starch has been used look a little lighter in color, but the better class of leathers are not so dressed. The dry gutta-percha can be redissolved in sulphuret of carbon and used over again.

You can read more about gutta-percha at http://collections.ic.gc.ca/cable/gutta.htm

A Glue from my Archive

Found this in 'Henley's Twentieth Century Formulas, Recipes and Processes (1926):

Glue for Leather or Cardboard.—To attach leather to cardboard dissolve good glue (softened by swelling in water) with a little turpentine and enough water in an ordinary glue pot, and then having made a thick paste with starch in the proportin of 2 parts by weight, of starch powder for every 1 part, by weight, of dry glue, mix the compounds and allow the mixture to become cold before application to the cardboard.

Friday, September 09, 2005

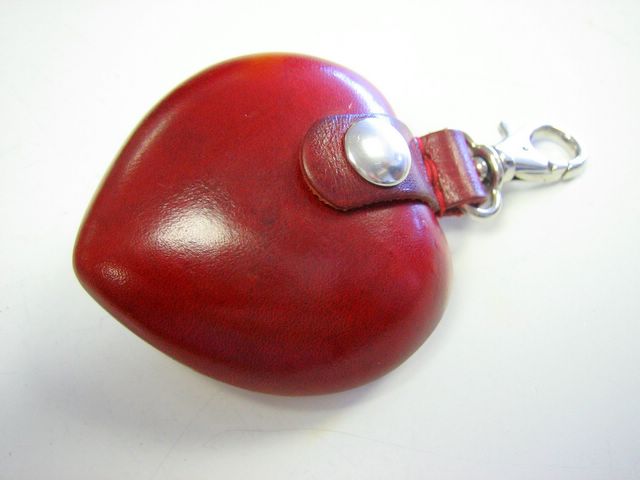
A Very Unique Coin Purse


The Front of the coin purse.

This very special hard leather coin purse was shown to me by someone who had bought it in Germany. It is a Paulette Rollo Coin Purse


Its construction was a point of interest. It was made of two shaped halves of leather that was glued together, but there is no visible glue to be seen. The outside is so perfect, that we gathered it was molded inside a mold, maybe while it was filled with a hard wax, which could have been melted out of the inside.

However it was made, it is perfect - when it is closed, it is a very smooth hard nicely shaped heart.


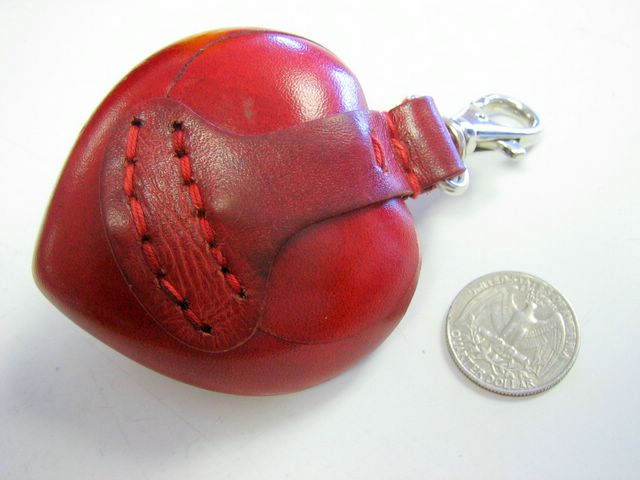
The back of the purse - the quarter is there to show size. the feint line you see on this side is the seam where the purse opens. The sewn on strap acts as the hinge.


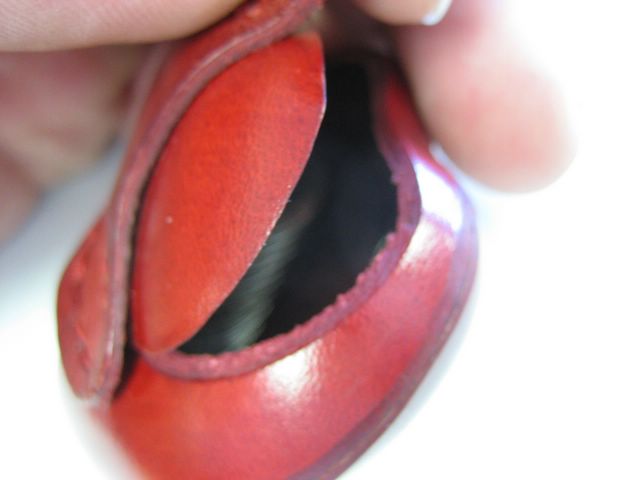
Here you see the 'lid' open - it is a perfect fit, obviously cut after the purse was shaped.


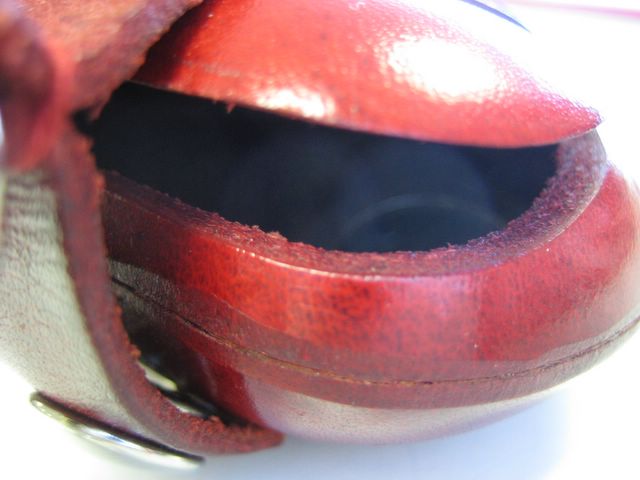
Here you can see the remarkable part of this unique piece - the seam where the top and bottom halves were joined - there is no sign of glue at all - the only thing you can see is clear on this photo: the seam was trimmed after it was glued.


See the very smooth inside of the purse - almost waxy. It made me think that it was probably formed around hard wax, which would then have been melted out. There is NO sign of any glue to be seen on the inside of the seam.

Saturday, August 06, 2005

True Artistry


These amazing two knife sheaths were created by J Drewes, a knife maker from Minnesota and I had the priviledge to have both in my hand. The photos do no justice to this amazingly artistic work - it is not often that it is so pleasantly visible that a lot of thought and care had gone into the creation of a leather article.

The fins and Frog feet are thinned and sculpted to look very real and yet the leather looks very strong and durable indeed - here is indeed a leather artist who enjoys what he is doing....

Thursday, July 14, 2005

Life casting

Leather Ralated? Yes, this is the first part that comes before the mask making you can also see on this blog - just about a month or two ago.

I attended the first of three classes by Alex Ortega in the making of your own mold on which to make a leather Commedia Del'Arte mask. The mold is of your own face! Freaky! But extremely interesting and a huge lot of fun!


The first part is to make a cardboard surround for your face so that the dentist's plastic do not drip on everything.


The subject lies ready to face the ordeal...!


The cold stuff hits your face and all goes dark - even through your closed eyelids. Two straws up the nose are your only breathing holes to the outside world and you have to lie with a totally still face for a few minutes while the plastics sets. You can hear all around you, but you cannot respond.

Alex was very good with a pre-arranged signal that would have the goo off your face in seconds if you felt uncomfortable!


While you lie there, motionless, a layer of plaster is applied over the dentist's plastic to support it - although it picks up the minutest detail of your skin, the plastic is not very tear resistant and is almost like very stif jello. From the time the first plastic hits your face to the time you can sit upright again, is probably only about 20 minutes. (The pink stuff smells very pleasantly of cinnamon and is not tooooo uncomfortable on your face.)


The first of the casts comes off and it is a negative copy of your face. This will be used to make a plaster copy of your face. Even the pores on your nose are shown on this material and on the plaster cast made of this.


This is the second casting - plaster into the flimsy pink negative - this will be the first copy of your face.


And this is what the copy of your face looks like!

Soon, more photos of myself suffering this indignancy and what my own mold looks like!