Monday, September 12, 2011

Huarache Pouch

Two postings ago I showed the Huarache sandles I made.   Well, on a recent barefoot hike I realized it would be nice to have my huaraches with me when the going gets tough....   But, I want to carry as little as possible.  So I am going to try this pouch that will hang from a belt.

The construction took some carefull planning - I wanted the pouch to be quite flat and so sewing in the veg tan 'mouth' of the pouch was done in stages, first attaching it to the front, then closing the body of the bag and then stitching the back of the mouth to the back of the bag.  Lastly the flap was sewn on and the two d-rings riveted in.

In the photo above, my huaraches are actualy in the pouchand it stays quite flat.

Here is my huaraches peeking out:

Friday, August 19, 2011

Video of Stohlmans

An old video from Tandy!  Now you can see what the Stohlmans looked like in real life. 

I was lucky enough to have met Ann in real life at the Stohlman museum in Sheridan, WY a few years before she passed away.

Tuesday, August 09, 2011

Huaraches

I made these very simple Huaraches today.  They are also known as Tarahumara Running Sandals, used by many long distance runners.

My aim was to use leather easily available at a Tandy store, some contact adhesive, and a hole punch.

Here are the steps:

First draw a pattern for the soles - there are many videos on YouTube that show you how to do this.

On this pattern you will see the dot I marked between my big toe and the rest as well as the two marks on either side of the heel to show where my ankles are.  I then used the scribe awl to outline the patterns onto the leather.  I used a 4-5oz veg tan  (tree bark tanned) leather - you can get a single shoulder or a belly for the job.

Make sure your two patterns - one for each foot - faces up so that left is left and right is right.  Have the grain side of the leather facing up so that you will be walking on the smooth leather.

These upper soles are then cut out of the leather on those scribed lines.   You do not need a fancy knife like this - a sharp utility knife will work well.

Where I marked the spot between my toes, I punched two holes so that I can cut two lines to form a slot between them.   One hole was where I marked the spot and the second hole is more towards the front of the sole.

I got 60" latigo saddle strings from Tandy - 1/2" wide - they are nice and soft and very strong.  One tip went through the cut slot in such a way that when I take the strap to the outside of my foot, the grain side will be on top.  On the next photo I have applied contact adhesive to the tab of saddle string sticking out on the bottem of the sole as well as to the sole where the tab would fold flat.

The tabs are bent over to glue them onto the bottom of the soles.  Now the soles are glued down onto another layer of leather - flesh side to flesh side.

This makes the soles a bit stronger and the grain side should wear a bit better.  You could just use a thicker leather to start with, but that would mean that you cannot hide the tabs of the saddle string between the two layers of leather that form the sole.

The bottom layer of leather is now cut out to shape according to the top sole that had been glued to it.  Careful not to cut through your saddle strings.

The last step is to make slots for the strings on the sides where your ankles are going to be.  I made them about 3/16" from the sides, through both layers of leather.  The strings need to slide through these slots freely so that you can adjust the fit of the huaraches.

There are many videos on YouTube again to show you how to tie these to your feet - basically the method I used was from the toes to the outside of the foot, through the slot, round the back of the foot to the other side, again through the slot, then to the string running from the toes, around your ankles and tied down.

In the back view you can see I need to trim these guys a bit - the soles are too big.   Rather too big than too small.

I wore them this evening for a few hours - very comfortable and very secure!

Sunday, June 26, 2011

Two Black Belts

I really do not like to work in black - it can cover really good carving!  But these belts were a request by a very special friend and there was no carving - just stamping on one and swivel knive cut decorations on the other.

Sunday, May 29, 2011

Swivel Knife Cuts

I have been practising my swivel knife work.   I do not like decorative cuts on floral carving, but I really like cuts just to decorate the leather without any tooling involved.  This piece was some leather lying around where I had illustrated to someone the difference embossing can make to a frame, here a frame made by swivel knife cuts.  The immitation wood on the right was just bevelled and cut on flat leather, while the frame on the left also had a plug behind it to give a more 3-D look to the frame.     

This left enough open leather for swivel knife cut exercises.

Next month the guild is going to have a fun share project of covering cans in leather, so I decided to get the first two leather 'jackets' ready for two small cans.

The one at the top of this picture will just be swivel knife cuts, inspired by Jim Linnell.   My rope effect will form a border at the top of the can.

In the second design, I decided to explore the possibility of slightly beveling the basic decorative swivel knife cuts.   It appears on this photo at the top.

Here is a bit more of a close-up.

...and even more detail to show you how I just let the beveling fade to nothing so that the design did not lose its light clean feeling.

Finally I decided to fill in a but just with knife cuts and I think it worked....

More on the covered can project later!

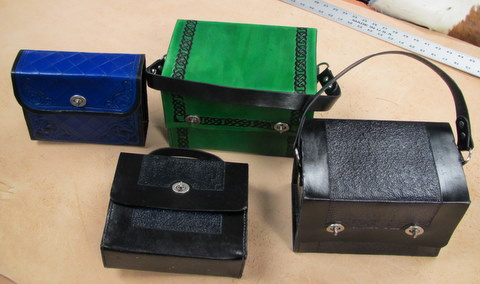
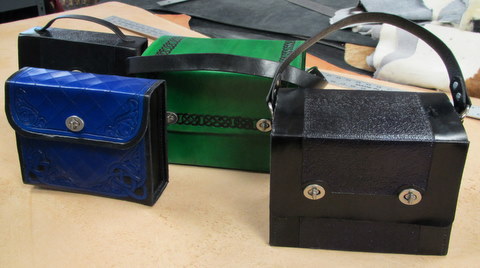
Tool Boxes

Not since Peter Main's toybox have I seen nice tool boxes like these!

Made by Jason Rolfstad.
They are made of a nice thick leather with formed gussets, so they are nice and sturdy, ever before the insides are installed.


The neat simple decoration add a lot to their appeal.


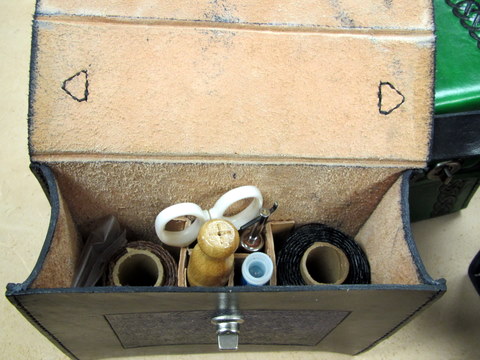
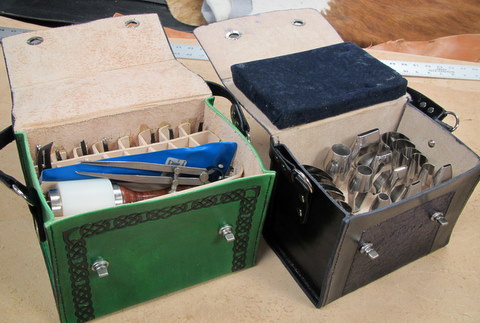
The narrower toolbox with all the hand sewing supplies, has leather dividers glued into place to keep everything neat.


To keep the end-punches neat, Jason layered pieces of cut leather in such a way that where they had slots in them, they would form holes where the tool handles would fit into.


I have been inspired - now I must just find the time!

Friday, May 27, 2011

New Design - A Timeline

A friend liked the cell phone case I tooled for my smartphone and wanted to see it, but I did not like the design too much - so I decided to come up with my own design.  It took a few doodles before it took shape in my mind and on paper and on the right hand you can see the final design on paper with the tracing film and leather with swivel knife cuts on the left.

As soon as I took the first photo, I decided to use the timestamp on the digital camera to record how long this little project took me to complete.  So to reach the stage above and below, probably about 45 minutes.

39 minutes later and I had the basic beveling done, as seen below.  (Total 84 minutes)

34 more minutes got the extra few decorative stamps and the backgrounding done.  (Total 118 minutes)

Another 30 minutes (without drying time) was used to apply Eco Flo Highliter and spray with Supersheen.  (Total 148 minutes = 2 hours 28 minutes)


email me if you want a copy of the pattern : leatherworker at gmail.com

Tuesday, April 05, 2011

Yellowing Combination

Someone showed me this curious case:

To color the roses, he first put down a layer of white acrylic paint and then did the lilac color in waterbased dye over the white.  he then sealed it with two coats of SuperSheen and then hit the whole belt with Tan Antique Gel.  The lilac color instantly turned to yellow - luckily a rich golden yellow and the belt looked fine afterwards.  

But it was not his intended result.  I was able to test the same on his test rose that you see lying next to the belt. (The pic on the right was what he used to color the roses from.)

I put Tan Gel antique on the upper tip of the rose and as you can see, that turned yellow.   Then I put Dark Brown Antique gel over the middle section and it had now effect on the lilac color at all.

Any suggestions?

Sunday, March 06, 2011

Done really Fast

If you really want to do nice work, make something for someone else and speed through it at top speed!

That is how this check book cover got a quick, but very effective, double whip stitch edge - no time for double loop lacing.

Digital photography once again conceals the true beauty of the dye job.  I used a dauber ful of red dye to apply Saddle Tan Gel Antique and then sprayed it with supersheen.

Wednesday, March 02, 2011

Tandy in SA!

I just saw the news that Tandy now has a website just for South Africa.   Hopefully this will make its products and leather more accessable to South Africans.

Here is a link to the page:  TANDY SA

I see the orders will probably be processed from Woodheads in Cape Town.  That is where I bought my first 3 ounce belly, the basic tools and made a 2" wide belt for my bell-bottom pants on the mother's dining room table (no marble stone at that stage and no sence about the right weight of leather to use!  That was in January 1978.  I should probably publish a picture or two of that first belt!  I did actually use it too....