Wednesday, May 25, 2005

Mask Making Class #2

Last night we concluded the class, but the home work continues....

But let me start where I left off....


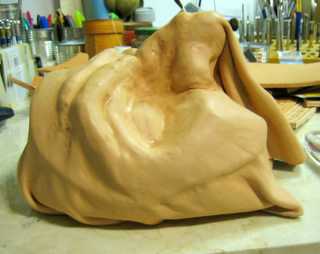
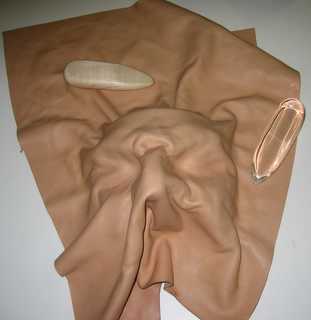
Here you can see just how much the leather has to stretch to fit around the mold.

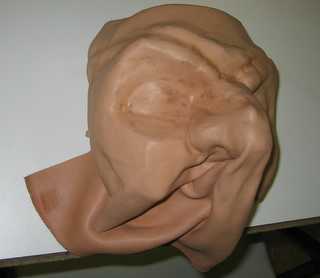
With a lot of tapping and burnishing, allth detail comes to the fore - the mold is rough and full of character and the leather thin enough to shown almost all of it.


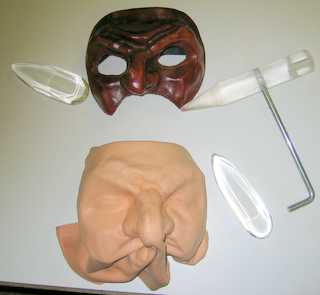
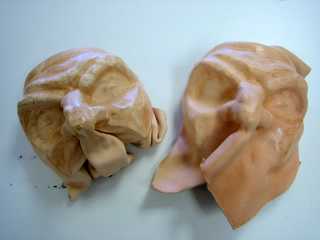
After the first mask had dried completely, I took it off and made a second one with a thicker leather. (To get technical: the mask on the left was made with 2-3oz leather and the one on the right with 5-6oz leather.)


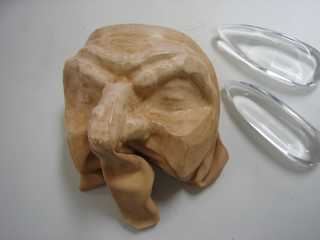
With the leather in shape, we trimmed away the excess around the edges and the gathering under the nose, so that a small seam can be made.


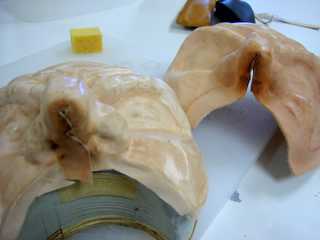
It is the wet leather (under the noses) that make it appear so dark.

Next time, coloring the mask ......

Thursday, May 19, 2005

Mask Making Class #1

After continuously teaching others about leather and how to do various aspects of leathercraft, it is refreshing to be on the other side for a change. I started a class in Commedia del'Arte Mask Making given by Alex Ortega. And the one important ingredient to leatherwork classes was there: fun!

This is the start: wet leather is formed over a mold. (This is a life cast of a person's face, that have been embellished to give more character.)


By continuously rubbing and tapping with the small point of the hammer, the leather stretches over the mold.


It takes a lot of work to convince the leather to take the shape you want it to take! But once you start the process, you do not want it to end!


This is where we ended with the class - another three hours of work and the results in the next posting!

Monday, May 09, 2005

Leather Pouting

Last year at the Minnesota State Fair I was watching Roger Abrahamsen doing some traditional old time wood turning - the lathe is driven by a flexible wooden pole above his head (not visible in this photo due to the high speed movement of the pole).


When he turned round, I saw a very special knife and sheath hanging from his belt - a Norwegian knife in an extraordinary sheath. The knife and sheath was made bu Knut Dahl who have been to the USA a few times - I have even met people who has taken knife making classes with him here.

The leatherwork for the sheath is done with a process called pouting - the leather is tanned so that the deeper layer is still rawhide, to provide a steel hard casing for the knife, and the top layer is normal veg tan leather, so that it can be "pushed around" to form the designs.


More of Knut Dahl's work can be seen at this LINK

Sunday, May 08, 2005

Inspiration from Down Under

This is a toolbox I made for my favorite tools. The inspiration comes from one of the top Leather Artists in the world, Peter Main. You can see more of this toolbox on my leather portal at
http://www.johan-potgieter.com/leat-toolb1.shtml


Even though I am still extremely young, I have reached the age where the focal length of my eyes are longer than my arm length and so a good magnifying glass on a stand make life a lot easier.....

Saturday, May 07, 2005

The Vitruvian man


This little pyrography on leather has a tale to tell. It started off as you see it here - spent many months in a store window where it first got darker and then the sun beached it to a very light color.


Friday, May 06, 2005

Lacing Fids

I have had these two lacing fids made for me by a fellow leathercrafter and they are two of my most valuable tools.


Their value is not in their cost, but in the absolute ease with which they lift up laces in braiding and fit into the tightest places to make braiding a joy!
The top one has a wider tip and the bottom one has the more traditional rounder tip.


If you have comments about lacing fids, or a picture of your favorite, send it to me!

Black and White Dogleashes

The braiding I am keeping myself busy with mostly! This is all kangaroo lace and very nice to braid with.